Wednesday, June 20, 2012

It's Summer...Cheers!

Summer time is here and now is the perfect time to dust off those summer cocktail recipes!  My favorite summer cocktail is the Mojito.  I love the combination of mint and lime with just enough soda water to make it bubbly and refreshing. 

Classic Mojito

Start with a tall glass.  Add in about 10 mint leaves.  Next add the juice of half a lime along with the juiced lime wedges.  Now you want to "muddle" the mint leaves and the limes and juice until fragrant.  Muddling is basically just smashing everything together.  I used the pestle from my mortar and pestle set.


Next you want to add ice to fill the glass.  I then add about 2 Tbsp. of simple syrup (recipe below) and as much clear rum as you want ;).  Top off with soda water, mix, and serve!  Delicious!!!


Simple Syrup

Add 1 cup of sugar to 1 cup of water in a small saucepan.  Heat until sugar completely dissolves then cool before using.  Store in the refrigerator.


 ***

My all time favorite cocktail ever is a Bloody Mary.  I love the spiciness of the drink, but what I love the most are the garnishes!  To me a Bloody Mary isn't really a summer drink but I wanted to find a way to make it work in the hot summer months.  I wondered how it would taste if you blended the drink with ice.....Delicious!!! 

Frozen Bloody Mary

Fill a blender with ice.  Add in vodka to taste and then fill with Bloody Mary mix.  Blend, Garnish, Enjoy!


Garnish.....The sky is pretty much the limit when it comes to garnishes for your Bloody Mary.  Traditionally it is garnished with celery and queen (the larger size) green olives.  I have also seen them garnished with pickles, and pickled jalapenos.  My favorite garnish is the jalapeno stuffed green olive!


Vodka and Mix......I have discovered the best Bloody Mary mix ever and it is definitely worth searching out.  The name is Zing Zang and to me it has the perfect balance of tomato juice and spices.  I love to mix it with Absolut Peppar vodka for a little extra zing!


 ***

My final suggestion for a summer cocktail is a very easy one.  Add some frozen fruit to a glass of white wine or champagne and voila!  You can buy frozen fruit or freeze fresh fruit.  It keeps the wine cool and it is very refreshing!


Enjoy and Cheers!

Kristen and Alyse

Tuesday, June 19, 2012

Desk Redo

So Kristen had been wanting a larger piece of furniture to serve as a buffet in her formal room.  She wanted something inexpensive and I wanted her to get something I could refinish.  She has more room in her house than I do so I go there to do most of our projects.  Anyway, her husband came home one day with this ugly duckling in the back of his truck.  


Now it was solid wood and sturdy but very dated and the top was water stained and pretty scratched.  It also was the wrong look all together.  I couldn' wait to get my hands on it.  The first day we started on it I was coming down with a cold but I had to go. 

We came up with a final plan to stain the top of the desk a really dark color then paint and distress the bottom a light color. We started with removing all the doors and hinges. Then we had to sand down the top part all the way to the bare wood.  We used a power sander and took turns as our hands were pretty numb. We also sanded the rest of it by hand just enough to rough up the surface a bit.  It started to look like the picture below.


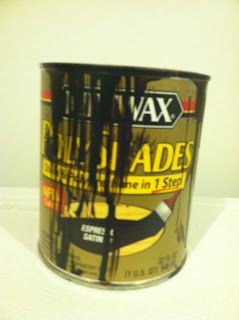
Now after all the sanding was done we vacuumed up all the dust and wiped down the desk.  We then applied the first coat of stain to the top.  We used Minwax Polyshades in Espresso satin.  It does not require a sealer over it so its one coat, a light sand, a second coat and done. It is very dark but its what we were wanting.  Clearly I am not a clean painter....


We waited a couple days before starting on the bottom part of the desk.  I picked up some Behr paint in an antique white color and put 2 coats of paint on the desk, doors, and shelves. 


While that was all drying we spray painted the original hardware an oil rubbed bronze color.  This is by far our favorite color of spray paint.  I get excited when I have something to paint that color. Then, we needed to start the distressing.  I had been hearing a lot of things about how awesome glaze was so we decided to try it out.  I bought a quart of clear glaze and a tiny sample can of a chocolate brown paint.  We mixed it according to the glaze directions and with a  foam brush I applied section but section to all the corners and little nooks.


After you brush on a section you use a damp towel and wipe off.  This will leave the dark color in all the tight spaces. You will get this effect....


After everything was dry we put the shelves and doors back on and had Kristen's husband move it into the house. Here is the final look.  We are very pleased with the end results. 


It goes perfectly with the rest of her furniture and it is no longer an ugly duckling.  The only thing we had to pay for was the paint and stain but we have enough stain and glaze to do a million other projects.  This really was an inexpensive project and a lot of fun.

Have a good Tuesday everyone. If you enjoyed this post please share or pin it.
Alyse and Kristen


Monday, June 18, 2012

Military Monday...Yes, We Are "Diggits"

As I look around my house, reminders of the Navy, specifically the submarine force are everywhere.  Okay, I am being modest.  Basically it looks like a submarine threw up in my house.  I am what is lovingly (or not so lovingly depending on who you ask) referred to as a "Diggit."  For my civilian friends who may not have heard this term before, it is pretty self-explanatory.  I "dig" the Navy, especially the submarine force.


My evolution into a "Diggit" was a slow process.  When I got married and got my first taste of this lifestyle I was less than enthused.  Okay, again I am being modest.  I HATED IT!!!!!!  There was not a single thing I liked about the Navy.  They stole my husband, made me move away from my home and family and controlled every aspect of my life, or so I thought.  It was as I grew older and wiser ;) I realized that this lifestyle wasn't as bad as I had originally thought.

After about six months of living in our first duty station, Charleston, South Carolina I realized that I had been given an incredible opportunity.  I was born and raised in the same small Wyoming town.  I even went to college there.  I was happy, content, and comfortable.  I had no plans of leaving...that is until I married my sailor.  Two days after getting married the U-Haul was packed and we were on our way across the country.  Never in a million years did I ever dream of living in South Carolina so I vowed to act like tourists and explore each duty station to which we were assigned.  We spent many days in downtown Charleston walking around the market, Rainbow Row, and the Battery.  We would lounge around on the beach at Isle of Palms while my friends and family back in Wyoming were freezing.  In Albuquerque, New Mexico we attended the famous Balloon Fiesta and indulged in the local tradition of green chili...roasting, peeling, and eating it on everything.  We explored upstate New York including Lake George and the parks and racetrack in Saratoga Springs.  Maine was all about the lobster or "lobstah" as known to the locals.  Now that we are in Connecticut our adventures continue courtesy of the Navy.


I have learned that life is about perspective.  There are definitely some negative aspects about the military lifestyle.  But I have discovered that making an effort to focus less on the negative and more on the positive my happiness with our life has increased.  Of course I have bad days.  I wouldn't be human if I didn't and I allow myself these days.  You need them to recharge.  There are times when the chaos, loneliness, and stress are too much to take.  When this happens I try to do something special for myself even if it is putting the kids to bed a little earlier than usual and sitting down in a quiet, peaceful house with a glass of wine and a good book.  I allow myself to cry or vent to a friend but I know that I must move past my current sorrowful state and focus on the positive.  The Navy has given me adventure, experience, independence, a can-do attitude, and friendships that are unmatched.


The Navy has also allowed me to look at my husband in a way I never would.  I am so extremely proud of his service to our country and the job he does.  Words can't even explain.  Even though I am incredibly sad every time his submarine heads down the river and out to sea I have to watch because the sense of pride and patriotism I feel help dull the heartache of missing my love.  I have watched the submarine leave more times than I care to count but the feelings are just as strong as the first time I watched him leave.  I will probably always be that wife that goes to the pier or beach to watch the submarine whether they are coming or going because I am a "Diggit" and I am proud of it.


Kristen and Alyse


Tuesday, June 12, 2012

Hawaiian Topiaries


We were both on the Dolphin Scholarship Auction committee this year.  Kristen the Gold Chair and I was the Decorations chair.  I made all the centerpieces and they were fun and easy to make.  Before I go into that though I thought I would give you a little more info about the Dolphin Scholarship.


The Dolphin Scholarship is available to undergrad students who have a parent that is qualified in submarines and has served at least 8 years in the submarine force or 10 years served in submarine support activities. Currently, they award a student $3,400 annually.  The scholarship is funded by the Submarine Spouse Organizations, the submarine community, individual donations, and from corporations.  For more info about the Scholarship visit the DSF website here


Anyway, back to my topiaries.  So I found a link online with the idea. You can see it here


I purchased foam topiary forms from a craft store and purchased a box of the paper parasols you would put in a drink.  I simply stuffed the parasols into the round foam ball then stuck the other end into a clay pot. 


Heres a close up of a finished one.  I then wrapped green tulle around the wood part to give it a finished look.  I also added some green moss to the top of the pot to cover the foam base.  It really is that simple.  It took me no time at all and were great festive centerpieces for our Hawaiian luau.


Here is a picture of a finished one at our auction kick off party. 

So there you have it.  A simple summer craft. 
Alyse and Kristen


Monday, June 11, 2012

Military Monday--Our Flag...

For this week's Military Monday post we will be focusing on the flag of the United States of America.  Flag Day will be celebrated later this week on June 14th so we thought it would be interesting to talk about the history of the flag and proper flag etiquette.

It is not certain who designed the first American flag, however, many believe that the flag was designed by Congressman Francis Hopkinson and sewn by seamstress Betsy Ross.  In the early days of the flag, there were no specifications on how it was proportioned thus leading to many different arrangements of the stars and stripes.  It wasn't until an Executive Order dated June 24, 1912 that the proportions of the flag were outlined and a standard for the flag was set.

Betsy Ross Flag


Some important dates in flag history....
  • On June 14, 1777--Continental Congress passed the first Flag Act: "Resolved, That the flag of the United States be made of thirteen stripes, alternate red and white; that the union be thirteen stars, white in a blue field, representing a new Constellation."
  • Act of April 4, 1818 - designated that the flag have 13 stripes and one star for each state, to be added to the flag on the 4th of July following the admission of each new state, signed by President Monroe
  • Executive Order of President Eisenhower dated August 21, 1959 - provided for the arrangement of the stars in nine rows of stars staggered horizon tally and eleven rows of stars staggered vertically.
President Truman signed an Act of Congress on August 3, 1949 officially designating June 14th at National Flag Day.  Although not "official" until that date, Flag Day is believed to have originated in 1885 when a Wisconsin school teacher, BJ Cigrand, arranged for his students to celebrate the "Flag Birthday."


Flag Etiquette

Standards of Respect

  • The flag should never be dipped to any person or thing.  The flag is flown upside down only as a sign of distress.  
  • The flag should not be used as a drapery, or for covering a speakers desk, draping a platform, or for any decoration in general.
  • The flag should never be used for any advertising purpose. 
  • The flag should not be used as part of a costume or athletic uniform, except that a flag patch may be used on the uniform of military personnel, fireman, policeman and members of patriotic organizations. 
  • The flag should never have placed on it, or attached to it, any mark, insignia, letter, word, number, figure, or drawing of any kind. 
  • The flag should never be used as a receptacle for receiving, holding, carrying, or delivering anything.
 
  • When the flag is lowered, no part of it should touch the ground or any other object; it should be received by waiting hands and arms. To store the flag it should be folded neatly and ceremoniously. 
  • The flag should be cleaned and mended when necessary.  
  • When a flag is so worn it is no longer fit to serve as a symbol of our country, it should be destroyed by burning in a dignified manner.  (Note:  Most American Legion Posts hold flag burning ceremonies on Flag Day, June 14th.  Local Boy Scout and Girl Scout Troops also retire flags on occasion.)

 Displaying the Flag Outdoors

  • When the flag is displayed from a staff projecting from a window, balcony, or a building, the union should be at the peak of the staff unless the flag is at half staff. 
  • When it is displayed from the same flagpole with another flag - of a state, community, society or Scout unit - the flag of the United States must always be at the top except that the church pennant may be flown above the flag during church services for Navy personnel when conducted by a Naval chaplain on a ship at sea. 
  • When flown with flags of states, communities, or societies on separate flag poles which are of the same height and in a straight line, the flag of the United States is always placed in the position of honor - to its own right.
    ..The other flags may be smaller but none may be larger.
    ..No other flag ever should be placed above it.
    ..The flag of the United States is always the first flag raised and the last to be lowered. 

 Raising and Lowering the Flag

  • The flag should be raised briskly and lowered slowly and ceremoniously. Ordinarily it should be displayed only between sunrise and sunset. It should be illuminated if displayed at night.
  • The flag of the United States of America is saluted as it is hoisted and lowered. The salute is held until the flag is unsnapped from the halyard or through the last note of music, whichever is the longest.

Displaying the Flag Indoors

  • When on display, the flag is accorded the place of honor, always positioned to its own right. Place it to the right of the speaker or staging area or sanctuary. Other flags should be to the left. 
  • The flag of the United States of America should be at the center and at the highest point of the group when a number of flags of states, localities, or societies are grouped for display. 
  • When displaying the flag against a wall, vertically or horizontally, the flag's union (stars) should be at the top, to the flag's own right, and to the observer's left. 

Parading and Saluting the Flag

  • When carried in a procession, the flag should be to the right of the marchers. When other flags are carried, the flag of the United States may be centered in front of the others or carried to their right. When the flag passes in a procession, or when it is hoisted or lowered, all should face the flag and salute. 
  • To salute, all persons come to attention. Those in uniform give the appropriate formal salute. Citizens not in uniform salute by placing their right hand over the heart and men with head cover should remove it and hold it to left shoulder, hand over the heart. Members of organizations in formation salute upon command of the person in charge. 

Pledge of Allegiance and National Anthem

  • The pledge of allegiance should be rendered by standing at attention, facing the flag, and saluting.
  • When the national anthem is played or sung, citizens should stand at attention and salute at the first note and hold the salute through the last note. The salute is directed to the flag, if displayed, otherwise to the music.  

Flag in Mourning

  • To place the flag at half staff, hoist it to the peak for an instant and lower it to a position half way between the top and bottom of the staff. The flag is to be raised again to the peak for a moment before it is lowered. On Memorial Day the flag is displayed at half staff until noon and at full staff from noon to sunset. 
  • The flag is to be flown at half staff in mourning for designated, principal government leaders and upon presidential or gubernatorial order. 
  • When used to cover a casket, the flag should be placed with the union at the head and over the left shoulder. It should not be lowered into the grave.  

All information for this article was obtained from www.usaflag.org


Friday, June 8, 2012

Feature Friday....The Bun and The Oven


This Friday we will be featuring a company called The Bun and The Oven.  This company was created by a fabulous stay-at-home mom, who also just happens to be my sister ;).  She creates customized gifts for babies as well as the ladies.  Below are photos of some of her work.  She is happy to work with customers to create the perfect personalized gift!  For more information please check out and like her Facebook page.

Have a great weekend everyone and we will see you Monday with our next Military Monday installment!

Kristen and Alyse

Fabric Covered Canvas Hanger
Grace Onsies


Myles Shirt

Burp Cloths

Burp Cloths
Little Boy Onsies
Infant Car Seat Cover-Baby Girl


Jungle Pictures-Nursery Paintings
Wooden Initials-Nursery
Reversible Bag
Reversible Bag
Painted Table and Chairs--Little Girl

the bun and the oven   

Thursday, June 7, 2012

DIY Faux Tile

As a navy wife you learn to do many things by yourself that you would have never thought you would do.  In the last 10 years we have become efficient plumbers, gardeners, painters, and exterminators all while keeping up with all of the mom duties.  The hardest job for us to tackle by far was the exterminator. We have killed palmetto bugs the size of Volkswagons and have had to deal with the random dead bird of frog that our pets have brought in to share with the rest of the family.

I have yet to find a DIY product that intimidates me, but I have been getting the urge to try bigger and better things. In the last couple months I have learned to use a power sander, a compound saw, and a nail gun.  During my husbands last underway I got the urge to spice up my kitchen a bit.  I have been wanting to add a tiled backsplash to it, but I ran into a couple problems.  The first, being I have no clue how to tile anything and second, we live in a rental home.  I really don't want to spend the money to tile. 

I had been online looking for quick and easy ideas and came across a blog about painting faux tile on your kitchen walls.  After a little research I thought I would give it a try.  Let me just tell you that it was very easy and came out great.  I will share some of my pictures with you but if you really want a better understanding please visit the blog that inspired me.  Sawdust and Embryos

First, I started off by taping the perimeter of my backsplash area and then painting it a solid white color to give the finished product a clean grout line. 
Second, I began taping out tiles.  i cut my tape to 1/4 inch and measured out each tile the size i decided. I think I went with tiles that were 1.5 inches in height but the width i did not measure. I just made them as i went. Then I started painting random tiles and mixing my paints together to create different looks.  I bought the bottles of craft acrylic paint from walmart.  I used 4 bottles of browns and tans and 2 bottles of reds to accent.  
So, i just kept going.  Mixing and painting. Random colors in random places.  I used the cheap foam brushes so I could just toss them when I got done.  I hate cleaning out a brush.  Finally the wall looked like this.
After the paint is almost dry I began peeling the tape off and this is what it looked like.

It really didn't take too long.  I did it all in about 2 afternoons.  Although those afternoons were about a month apart.  I am so good at starting a project and not finishing.  My kitchen looks so much better and I have scrubbed it and the paint seems to be holding up well.

Check back next week for another project!
Love,
Alyse and Kristen